April 16, 2015
I wholeheartedly believe that if our industry held one philosophy above all others, scrape rates (misprints) would drastically decrease and profits would subsequently increase.
That philosophy is: “The quality of the finished printed garment is directly proportional to the quality of your screen.”
The screen is at the heart of the screen-printing industry. The effort put into this one critical component will have the greatest impact on the finished product as it emerges from the dryer. Since there is no one manual to which novice textile screen printers can refer, most are steered in the direction that their salespeople lead them. The simple fact is that where the screen is concerned, it is quality in, quality out.
Let’s review the components and procedures required to produce the best quality screen for your shop.
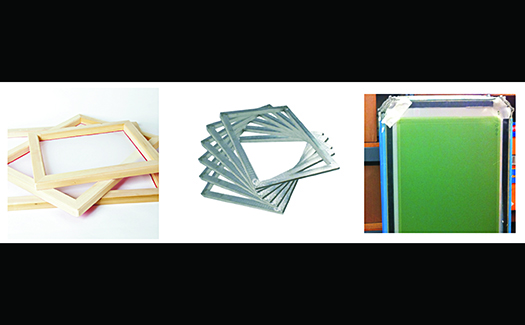
THE FRAME
The frame is the base for the entire textile screen-printing process. This is the first decision a printer has to make with regard to his commitment to quality when setting up his shop.
Wood frames. This type of frame offers the most economical means of stretching and printing. However, as with anything important, you get what you pay for. Of the three frame formats available, wood frames have a life span that require replacement at a certain point. Tubular aluminum and retensionable frames, however, have indefinite life spans.
The initial tension that’s achievable on a wooden screen can allow for quality printing to a degree, but the tension loss from frame deflection during printing wears on the frame and mesh. It will require restretching the mesh in a shorter period of time as opposed to the other frame options.
Tubular aluminum frames. These frames offer a greater advantage for screen printers because they do not bow over time from the constant stress of the mesh, and will not absorb water and chemicals from repeated cleanings and reclaimings. You typically also will achieve a greater initial tension when using tubular aluminum frames. The higher achievable tension will allow many advantages, which only increase in relation to the screen’s tension.
Although tubular aluminum frames cost about twice as much as wooden frames, they will not require replacement. The downside here is that once the mesh is adhered to the frame, the screen tension can go in only one direction: down. Inevitability, the mesh tension will drop to the point to where it must be removed and restretched.
Retensionable frames. These frames offer the greatest advantage for screen-printing quality for a wide variety of reasons, but the primary one lies in the name of the product itself. They are retensionable, which allows you to monitor the screen tension from run to run and retension the mesh when its tension drops below a given point. This drastically lengthens its life span.
The other advantages include:
• Greater mesh mileage
• Lower off-contact distances
• Lighter squeegee pressure
• Faster squeegee speeds
• Increased resolution
• Thinner ink-film deposits
• Softer hand
• Thinner emulsion coatings
• Lower emulsion consumption
• Faster exposure times
• Decreased reclaiming chemical consumption.
In many cases, the selection of frames for some shops is a decision made strictly based on financial restrictions. Though it may save money on the initial investment, going the cheaper route will cost more in the long term. Putting the previously mentioned benefits of retensionable frames aside, they will pay for themselves in six months in mesh savings alone.
Regardless of the frame you choose for your facility, always strive for the highest tension achievable for the frame with which you are working. Although reaching and maintaining the manufacturer’s recommended tension level is easy with retensionable frames, printers using static frames will need to monitor the screen’s tension over time.
SCREEN PREPARATION
Degreasing and emulsion-removal techniques play a critical role in making a quality screen. The screen requires a complete degreasing prior to the first coating. This is a repetitive process, where attention to detail can be lost in a short period of time. This (as well as every aspect of the screen-making process) requires written procedures that must be adhered to from screen to screen. Shortcuts are not acceptable.
The first tool required for this process is a good pressure washer — an industrial-strength unit with a 2,000-2,500 psi capacity. Smaller units will require more time to properly process a screen and could slow productivity.
When degreasing or reclaiming a screen, always work from top to bottom with the pressure washer. The objective is to thoroughly clean and remove all residue from the screen mesh’s surface. Since the majority of the stencil resides on the print side of the screen, follow these steps:
• Process the initial reclaim procedure from the ink side of the screen first.
• Repeat the process on the print side.
• Starting at the top, thoroughly rinse the frame on both the print and ink sides of the screen.
• Rinse both sides from top to bottom to ensure there is no residual emulsion left.
• Inspect.
Use a backlit washout tank during the reclaiming and degreasing process. This allows for section-by-section inspection and eliminates the need for a separate examination at the end of the process.
Once properly degreased, place the screens on a drying rack prior to coating. This rack should have its own area that is located away from the contaminated production area, but also not near the freshly coated screens. Once dried, they are ready for the coating procedure.
COATING TECHNIQUES
Coating procedures vary from facility to facility since there is no hard, fast rule regarding a correct or incorrect method. The objective of the coating procedure is to properly encapsulate the mesh in an emulsion coating with the stencil thickness on the print side of the screen.
You want the stencil thickness to be on the print side of the screen. This dictates that regardless of the coating combination you use, you will coat the ink side of the screen last. This process will push the emulsion coating to the print side. Otherwise, your stencil thickness will reside on the ink side, which will result in numerous printing issues, starting with the ink not properly releasing from the screen. You should maintain a thin emulsion coating when printing on finer mesh counts. This will allow for high resolution and faster exposure times.
Coating Variations
First Side Last Side
Print Side Ink Side
1 1
1 2
2 1
2 2
The chart above shows the variations in coating procedures used in different facilities. These vary based on the desired end effect. You typically would not use the 2/2 method unless you desired a thicker ink film. For printing standard wet-on-wet applications with mesh counts ranging from 160 to 230, I prefer the 2 print/1 ink. On mesh counts finer than 230, I would use the 1/1 application.
Coating speed also is important. Remember to pass the screen coater over in a medium and consistent motion. Doing this too slowly will result in emulsion spilling from the sides the coater. Do this too quickly and you will start to entrap air (bubbles) inside the mesh openings. This will result in pinholes either when the screen is washed out following exposure or — even worse — on the press. The most important aspect here is to coat the ink side last to ensure the stencil is on the correct side of the screen.
The one way to eliminate the human variable of the screen-coating process is to purchase an automated coating system. For those doing it manually, establishing the proper procedures to control and maintain the quality of your screens will only add to your facility’s productivity and profitability.
In Part 2 of this article, we will review the remaining techniques required to produce and maintain screen quality day in and day out. Look for it in the June/July 2015 issue of Impressions.
Rick Davis is the southeastern regional sales manager for Triangle Ink Co. He is a 35-year veteran of the textile screen-printing and apparel manufacturing industries. His background includes plant design, management and troubleshooting, and he also is a member of the Academy of Screen Printing Technology. For more information or to comment on this article, email Rick at rickd5050@yahoo.com.
Hear Rick speak on screen-printing topics at the Imprinted Sportswear Shows (ISS). Individual seminars are just $25 if you pre-register: issshows.com.
Suggested Reading:
Like this article? Read these and other screen-printing articles at impressionsmag.com:
• “Putting Your Best Print Forward”
• “Top Tips to Improve T-shirt Print Quality”
• “Handling Hoodies with Unique Printed Locations”
April 5, 2024 | Process + Techniques
Why do we often struggle with some of the seemingly simplest things, like slathering screen-printing ink onto a decorated-apparel garment. Slathering so that it looks clean, bright, opaque and altogether attractive.
FULL STORY
March 13, 2024 | Process + Techniques
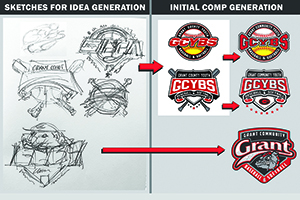
Wouldn’t it be wonderful if there was a secret formula for designing a best-selling T-shirt for a sports team, a business or for your own pre-print line?
FULL STORY
January 25, 2024 | Process + Techniques
As is the case with any craft, when it comes to screen-printing T-shirts and other apparel the devil is in the details. The best art, the best press in the world will inevitably come up short if you don’t take care of the little things as well.
FULL STORY