April 15, 2014
The interaction between needle, thread and garment can seem like a cruel joke to novice embroiderers. The image that is viewed on the screen is almost never the same as what is sewn on the embroidery machine. To compound matters, no two materials and no two backings are alike. The result is an endless set of guidelines designed to control these factors. Digitizing is truly the art of controlling distortion.
With every challenge in embroidery, a gameplan must be created to overcome them and create a beautiful design that runs flawlessly on the embroidery machine. Corners and short stitches are two factors that usually go hand in hand.
The focus of this article will be on four primary cornering types, along with an explanation of short stitches and why we have them.
Controlling Corners
The problem with corners in embroidery is that the outside and inside edges of a corner have the same amount of stitches; however, the space in which they have to turn the corner is significantly different.
In Figure 1, the red line indicates the turning space available for both the outside and inside edges. It is clear to see that the outer edge has quite a long distance, while the inner edge takes up virtually no space. Imagine the pounding that the inside corner is getting by having all those stitches in such a small area.
Consider short stitches a tool and defense mechanism to help control the inside of a corner.
In Figure 2, the short stitches are represented by the black dots. Notice how those stitches do not come all the way to the inside edge. By alternating standard and short stitches, the garment fibers are taking much less of a beating and have less of a chance to knot up or break threads.
Short stiches often are controlled within embroidery software and can be set to various settings. A way to control the amount of short stitches used is to expand the amount of space the corner has to make the turn. For example, starting the turn for the corner a little sooner and ending the turn a little later creates a longer inner corner space and reduces the amount of short stitches needed. Notice how much more space there is on the inside of Figure 3 vs. the inside of Figure 1.
In short, while short stitches help control the amount of stitching in an inner corner, they are a defense mechanism and should be used with care. Just imagine what the insides of corners would look like without this technique.
Another way to control the stitching in a corner is to control the corner itself. A corner can lend itself to two primary issues. First, there is a lack of turning space in an inner corner, which we covered with short stitches. The second issue is the fact that the stitch length in the actual corner is longer than the stitches just outside the corner and the result can be stitches that are too long. As a result, different cornering techniques were adopted to help ensure the proper stitch type for the situation.
Corner Types
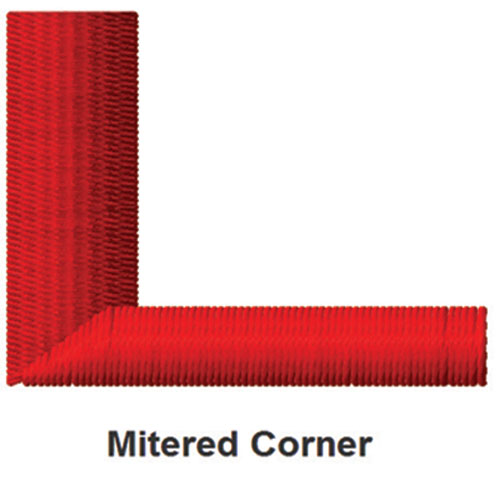
The first corner type is a mitered corner. Similar to a picture frame, it tapers into the corner on one side and then it tapers out of the corner. The stitches always stay parallel and never turn into or out of the corner.
With a mitered corner, the result is a corner with a noticeable corner line. The mitered stitches do need to overlap to prevent the material from showing through at the intersection of the two ends. Since the stitches will naturally pull in vertically on the vertical column and horizontally on the horizontal column, overlapping is mandatory.
The next type of corner is a hand-sewn corner. With this type of corner, the digitizer will try to mimic a corner as if it was literally being sewn by hand. The stitching will come to an abrupt stop on one side of the corner, make the turn (without stitching) and then start stitching once again.
Figure 5 shows the effect of a hand-sewn corner style. Notice how there is what appears to be missing stitches in the corner itself. A hand-sewn corner is not designed to be 100% lined up; however, the horizontal column will push down a bit and the vertical column will pull in a little bit. The result will be much less of a chunk missing from the corner itself.
The next type of corner is the auto-turn corner. This usually is the standard corner style within most embroidery software programs. The stitching starts turning at the end of one angle or directional line and slowly turns until it reaches another directional line. If the angles or directional lines are far apart, then the result is a smooth-flowing, gradual corner. If the angle or directional lines are very close together, then you will end up with a bulky corner loaded with short stitches. The more angle lines that are used, the more variations in resulting overall angles on the object.
The last type of corner style is the capped corner. It not only helps a corner look cleaner, but it also helps combat both the turning issue of turning stitches and relieves the stress of two separate columns being sewn into the same area.
The best illustration of this is with the top of a letter “A.” Each letter A has a different type of cornering technique applied to it to demonstrate the many different approaches that can be taken for a single section.
The auto turn will distort the top of the letter A as the stitches are twisting around the top of the letter. The two separate columns eliminate any type of corner issue, but place extra stress on the material at the top of the letter, as there are two columns overlapping. The capped corner uses one column stitch from side to side across the entire corner area. Then, the columns come up on each side and meet with that area. The result is that you have no turning or overlapping stitches, which help create the perfect solution.
The capped corner approach is great on smaller letters. One thing to keep in mind is that since the cap goes from side to side across the entire letter, the stitches in the capped area are going to be longer than the stitches in the columns below it. This means that when using a capped end, you will reach maximum desired stitch width a lot faster than when using other cornering methods.
As with anything regarding embroidery, no single technique will work in every situation. Your success may require trying a variety of these techniques or creating a technique of your own to find the perfect result. Getting a handle on short stitches and corners is just one more element to help you be proficient at the art of controlling distortion.
Ed Levy is director of software products at Hirsch Intl. and owner of Digitize4u, an embroidery, digitizing and consulting firm in Montoursville, Pa. For more information or to comment on this article, e-mail Ed at ed@hic.us.
Hear Ed speak on embroidery and digitizing topics at the 2012 Imprinted Sportswear Shows. Individual seminars are just $25 if you pre-register: issshows.com.
April 27, 2023 | Graphics + Design
When it comes to creating a design layout for a hat, hoodie or T-shirt, there are some basic concepts it’s important to keep in mind to create a design that’s pleasing to the eye, catches your attention and draws you in. One of these concepts is focal point.
FULL STORY
May 18, 2022 | Graphics + Design
According to Erik Cartmill, president of Cornerstone Impressions, Fort Worth, Texas, his business operates on the following philosophy: “Where there’s a Bill, there’s a way.”
FULL STORY
March 3, 2022 | Graphics + Design
“But I’m not an artist!” the screen printer said on the phone for the second time. He had agreed to do some work for his best customer, with a last-minute request for artwork help.
FULL STORY