Machine Embroidery Needles 101
Understanding the differences between machine embroidery needles and knowing which needle to use for each project will go a long way in developing your skills as a proficient commercial embroiderer.
FULL STORY
Instead of using the conventional methods of alignment and placement — like eyeing design placement and hoping for the best, or using a paper printout — you can use embroidery itself to ensure accurate garment placement.
Most digitizing software applications offer an option to create a printout of the embroidered design, which can be used for design placement on the garments. Alternatively, you can sewout a design with an enclosed run stitched box and centered crosshairs. I call this a “design target.” Using this method also works well for the initial steps in multihead production setups.
This technique gives you a true three-dimensional feel of the design and actual placement on the garment. The crosshairs and 90-degree angles are helpful for a good visual registration.
You can use the same color and type of fabric, and the same thread colors that will be used in production when building your target. This target swatch also makes a good reference piece. It can be kept with the rest of your job notation and records for future uses.
To create a design target, you will need: fabric (similar to actual working fabric, or as close as possible), backing, scissors, temporary adhesive spray, masking tape and a stapler.
Steps:
Digitizing
After the original embroidery design is completed, make a second copy of that same digitized design. Add a rectangular run stitch around the outer edges of the design copy. Then add edge-to-edge run-stitched crosshairs that run through the horizontal center and vertical center of the design. You now have a perfectly targeted embroidered design.

Production of Target
Using the desired fabric, hoop both the fabric and two strong cut-away backing pieces.
Run the targeted design using a high-contrast thread color for the outline rectangle and crosshairs. The outer rectangle stitches are ideal for closing the outer edges of the target.

Post Production
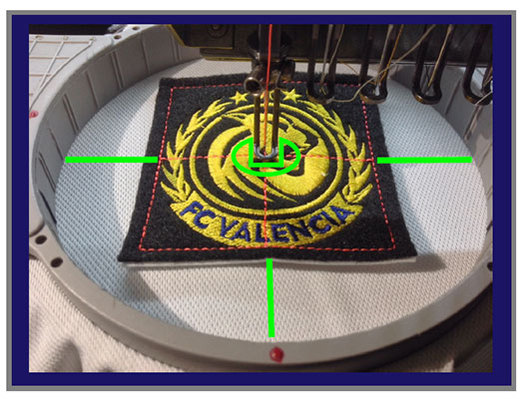
Cut around the outer edge of the rectangle run stitch and be careful not to cut into the run stitch. This process will make what looks and feels like an emblem (Figure 3).

Figure 3
Keeping the sticky sides out, roll the masking tape into a self-sticking ring. Then stick the double-faced tape pieces to the back of the target, and staple them directly into the back of the target for a more secure hold (Figure 4).

Figure 4
As the tackiness of the tape wears off in production, recharge the back of the target with a temporary spray adhesive. You now have a color-correct alignment tool that is durable and reusable.
Using the Target
Lay the garment to be embroidered out on a flat surface. Then determine the desired position on the garment for placement. Stick the target into place using the crosshairs and the parallel lines to correctly align the target to the garment (Figure 5), and then it’s time to hoop the garment.

Figure 5
Use the crosshairs and parallel lines again to line up any reference marks on the hoop (Figure 6), and then you’re ready to embroider. At the embroidery machine, drop the needle and move the panagraph till the needle and crosshairs line up (Figure 7). It is now perfectly lined up and ready to go.

Figure 6

Figure 7
Daniel Ceniceros, owner of Stitch’d Embroidery Development, has been designing embroidery for more than twenty years. For more information, visit stitchdemb.com.
Understanding the differences between machine embroidery needles and knowing which needle to use for each project will go a long way in developing your skills as a proficient commercial embroiderer.
FULL STORYWhether you’re running a small boutique embroidery shop or managing a large-scale decorated-apparel operation, attracting more customers to your business is crucial for growth and sustainability.
FULL STORY
There’s nothing more frustrating than being under pressure to get a job out and having something go wrong—and there are so many things that can go wrong!
FULL STORY