November 20, 2013
Like it or not, it’s a simple fact that most embroidery jobs use some type of lettering. Unless you’re only reproducing fine art via the embroidery medium, lettering typically is an integral ingredient.
One of my earliest embroidery mentors instilled in me an appreciation of the finer points of lettering. My father was fascinated with embroidered lettering and dreamt of creating a way to do what we know as keyboard lettering. In those days, cumbersome cardboard jacquards were read by pins that passed through holes, much in the same way that a player piano operates.
There currently are four ways to create data to stitch lettering on a computerized embroidery machine: custom digitizing, digitized keyboard fonts, auto-digitized TrueType fonts and alphabets as designs. Let’s take a look at the pros and cons of each method and how you can use each to your advantage.
1. Custom-Digitized Lettering
When creating logos, I prefer this method because there are small nuances to most lettering that only are captured by digitizing from the artwork, and in this method, the lettering is digitized specifically for each job.
The other reason to custom digitize lettering is to make it run efficiently. Custom lettering created by a professional or experienced digitizer is production friendly, and has the proper underlay and density values for the fabric onto which it will be stitched. I don’t try to force a keyboard font into a logo unless it’s a perfect match. Using a keyboard font for a logo rarely results in the same high-quality sewout that can be achieved when the lettering is custom digitized.
Sometimes special considerations — like time and money — can get in the way of using custom-digitized lettering. In these instances, three choices remain: keyboard fonts, auto-digitized TrueType fonts and alphabets as designs.
2. Digitized Keyboard Fonts
This quick-and-easy method is how most of us embroiderers create lettering for everyday jobs, from personalized sewouts to poems and scriptures, and everything in between.
In this method, letters and words are typed at the computer keyboard in much the same way as you type in a word processing program like Microsoft Word. The user selects the style, size, density and other parameters, and the stitches are generated according to the user’s instructions.
In most systems, the resulting lettering is fully editable. The best practice is to save in the native format of the software so that it can be edited later, in the event that it doesn’t stitch as planned or you discover a misspelling. Then, save the lettering to a stitch file, such as DST or EXP, to be easily read by an embroidery machine.
Even though the software you regularly use probably has about 100 digitized keyboard fonts, chances are good that you use only a few select favorites. That’s because you know them well and they’re reliable. You don’t have to do a test sewout before each job because you have used these fonts so many times that you can predict the styles that will work well in a small size, as well as the ones that are bold enough to stand out on plush material.
Of course, you know the “bad” fonts too — such as the script fonts that have awkward connections or strange characters (like a “T” that looks like an “I” and an “S” that doesn’t look like any handwriting you’ve ever seen). Some sophisticated software packages allow you to edit characters and save them for future use.
Still, I’m a believer that you can hardly have too many lettering software packages. When trying to match a keyboard font to a specific customer-requested font style, it seems that the customer’s lettering always has at least one character that’s different than the similar font in your system. Instead of spending up to an hour trying to edit the character, a different software package could have a font that more closely matches what your customer wants. Most embroidery software brands have reasonably priced lettering packages, which are good for ensuring lots of lettering options.
3. TrueType Font Generation
Modern software packages also usually include a TrueType font generator that converts TrueType fonts into stitches. This can be useful for certain lettering styles and sizes, but the resulting lettering sometimes contains incorrect stitch directions and other edits may be needed.
When used with discretion and proper settings, this type of lettering can serve a purpose. However, be aware that many TrueType fonts will need to be adjusted to their column widths using the “Pull Compensation” feature of your software.
4. Alphabets as Designs
This lettering option is mostly used for monograms and other jobs that don’t require many letters. Each letter is stored like a design in a folder on your computer, and then they are merged later.
There are many decorative and themed alphabets, such as ones with angels, flames or circus animals adorning the side of each character. There also are fancy alphabets, including script styles with glamorous flourishes and block styles that appear to be made from fence posts.
One of my favorite ways to use alphabets is to combine them with compatible keyboard fonts. First, I open the alphabet character that will serve as the capital letter in a word or name. Then, I select a compatible keyboard font from my software and type in the lowercase characters to make a complete name with a decorative capital letter.
As previously noted regarding keyboard fonts, sizes, densities and other characteristics can easily be adjusted within the software. In contrast, editing these characteristics in alphabets may be more limited, depending on the capabilities of your particular software package.
Richards Jarden owns embroideryarts.com, a design company that specializes in high-quality alphabets. Jarden controls aspects of his alphabet creations to maintain their stitching integrity. For example, the company creates its fonts in various sizes to achieve the best quality for the customer.
When enlarging either alphabets or keyboard fonts in embroidery software, columns often get very wide and stitching quality suffers. Jarden provides alphabets in specific sizes so that he can digitize larger sizes with a reasonable column width that’s more pleasing and serviceable.
Alphabets also allow embroiderers to have access to specialty fonts, such as an entwined two-letter Victorian alphabet. The special alphabet contains a file consisting of every possible two-letter combination.
There are situations when each of these outlined options for creating embroidery lettering could be your best solution. Unique lettering can make or break a sale — as long as you remember its quality always is a factor as well. With all of the options available in modern embroidery software, it’s certainly possible to strike a balance between style and substance.
Deborah Jones is a commercial and home embroiderer with more than 30 years of experience in the computerized embroidery field. She runs myembroiderymentor.com and regularly speaks at the Imprinted Sportswear Shows (ISS). For more information or to comment on this article, email her at djones@myembroiderymentor.com. Hear Deborah speak on embroidery and digitizing topics at the 2014 Imprinted Sportswear Shows (ISS). Reduced rates for the conference program are available if you pre-register: issshows.com.
Keyboard Font Features
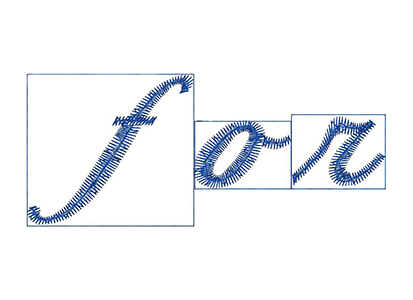
KERNING: One idiosyncrasy you’ll notice when using keyboard fonts is the need to adjust the kerning — or spacing — between the letters. This is most noticeable when working with script styles that must connect, and you may wonder why they can’t be programmed to connect automatically.
The lettering in the image above may help you to visualize why kerning is necessary. It shows the boundaries of each character as rectangles. In some systems, letters are placed on the screen with their boundaries touching. Value-based or manual adjustment is needed to create a pleasing arrangement in certain letter styles.
CLOSEST POINT CONNECTION: In past years, all keyboard lettering creations had a baseline connection, which means the joining stitch between characters always was placed at the bottom of a line of letters. “Optional Closest Point Connection,” a popular feature in some modern software systems, enables certain fonts to create lettering in which each character automatically connects to the next character at the closest point between them. This approach is practical only with letters less than ½-inch in size that are closely spaced. Software logic varies as to where the letters connect.
AUTO DENSITY: Some systems have the “Auto Density” or “Auto-
matic Stitch Spacing” feature that varies density as shapes get
narrower, preventing bulk in narrow areas while providing coverage in wide satin-stitched areas. This can be helpful in small letter sizes and font styles that taper or have narrow serifs.
STITCH TYPES: A great feature of keyboard font generation is that the embroiderer can assign a stitch type. In most systems, users can
decide whether to use a satin, fill or blended satin stitch. The latter function divides wide satin stitches into randomly divided stitches. These columns usually have longer stitch lengths and a less-uniform appearance than a fill stitch. They save on the amount of stitches used and still provide the liquid appearance of a satin stitch.
July 28, 2023 | Design + Digitizing
Very few things in life stand the test of time. As natural as the ebb and flow of evolution, most seemingly universal customs are founded and practiced with vigor, only to fade away with a whisper as the years tick by.
FULL STORY
August 16, 2022 | Design + Digitizing
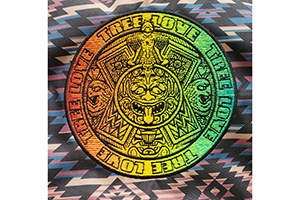
With this month’s On Design, we travel deep into the jungles of Central Mexico, harkening back to an ancient time where the Aztecs roamed the earth whilst building a formidable empire.
FULL STORY